Hello there, my friends. I like to 'wave' a smile to new visitors and friends. I saw new 'traffic' on my sidebar recently. To my new blog visitors, thank you for dropping by.
You can drop me a note because I love to know you.
Now back to this Peppermint project I want to share with you. Every year, I love to do a project which I can proudly display in my home or 'give' it to a loved one.
I want to share a tutorial with you. It is really easy and inexpensive to make. Join in!
Wendy's Hanging Frame

I used a piece of 12x12 Crate Paper Peppermint "Candy Cane" paper. Lovely motif. I just love its vintage feel.
1) Soak that piece in water. Yes.. please dont scream because I know water and our scrap papers just dont mix. Hang in there!
2) If soaking the paper is too much for you, just mist lots of water onto the paper.
3) Let it soak in for 1 min. We want the core fibers of the paper to get the moisture
4) Soak up excess with a kitchen towel.

5) With the moist paper, you will find it feels a lot like cloth. Soft (but not crumbly)
6) This is the best time to manipulate the paper. Crumple it. Crush it.... just put all your stress on it! LOL
Like this ball!

7) Next spread that 'crushed ball' out again. It looks really distressed!
8) Use a acrylic block (5x7inches) and put it in the middle of the paper
Tip: If you do not have an acrylic block, use a hardcover story book/metal tin which measures the same size.
9) Fold the rest of the paper toward the acrylic block to form a 'frame' or pocket
Tip: If your paper dries out and feel hard, wet your hand with water and let it the paper take in the water. The paper should feel soft and easy to fold and bend around.
 10) After you work all 4 sides, you will get something like this.
11) You get folds, you get layers and a nice 4.5x6.5 area in the middle to place your photo in.
12) Leave it to dry overnight... but I am a cheater.. i used a heatgun to quicken the proces!
10) After you work all 4 sides, you will get something like this.
11) You get folds, you get layers and a nice 4.5x6.5 area in the middle to place your photo in.
12) Leave it to dry overnight... but I am a cheater.. i used a heatgun to quicken the proces!
 12) Next, cut another piece of paper (appro 7.5x9.5)....this will go under this frame. i want some other color to peek out from the frame. You can size it to show about .75' out from the frame. It really depends what size you have moulded your frame to be. Adjust as you go.
13) Next cut a piece of corrugated board and dab with white paint ( I love to mimic some snow) and this is where the frame sits on
14) Finally decorate as you like. For this project, I cut out some motifs from another Peppermint paper and rest my title (chipboard) on it. You can take the embellishing to any level you like. That's the fun part. Scrapping is about your style. Enjoy it!
Hope you like it. You can 'mass make' these for grand parents and uncles and aunts who are far away. They would love to receive a hand made gift with your family shot in it! Surely a keeper!
Blessings ... I apologise for the lousy photos because lighting is really bad with the rainy weather here. Let me see if I can get a better shot tomorrow of the frame. Will try to repost some photos.
12) Next, cut another piece of paper (appro 7.5x9.5)....this will go under this frame. i want some other color to peek out from the frame. You can size it to show about .75' out from the frame. It really depends what size you have moulded your frame to be. Adjust as you go.
13) Next cut a piece of corrugated board and dab with white paint ( I love to mimic some snow) and this is where the frame sits on
14) Finally decorate as you like. For this project, I cut out some motifs from another Peppermint paper and rest my title (chipboard) on it. You can take the embellishing to any level you like. That's the fun part. Scrapping is about your style. Enjoy it!
Hope you like it. You can 'mass make' these for grand parents and uncles and aunts who are far away. They would love to receive a hand made gift with your family shot in it! Surely a keeper!
Blessings ... I apologise for the lousy photos because lighting is really bad with the rainy weather here. Let me see if I can get a better shot tomorrow of the frame. Will try to repost some photos.

 Hello friends, i have been so busy trying to make sure the house is in order for our traditional Chinese New Year celebrations. Yes... today is the first day and it is huge in our lunar calendar. We make new year goodies.... get the fridge stacked with food to feed visitors and guests. Our house has to be clean. Everyone buy new clothes to wear (this one is not tooooo difficult, LOL)....
TO all my Chinese friends, xin nian kwai Le. Happy Chinese New Year!
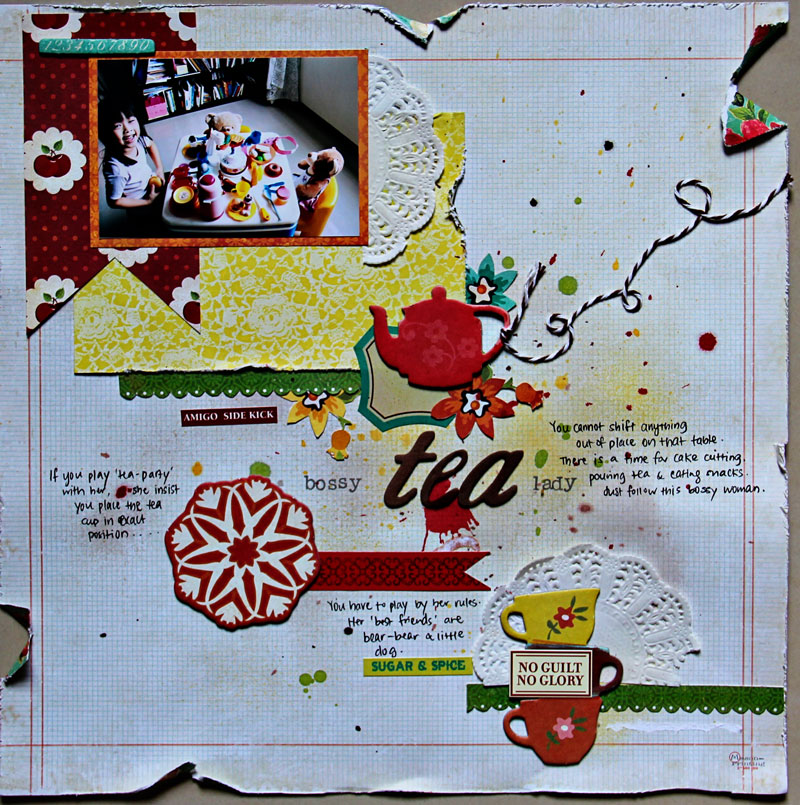
Meanwhile, hop over to CSI site and check Case file 3.... soft and beautiful colors. This photo was taken on 2 Jan and gosh... my little baby looks so grown up! She is clever and smart and definitely a witty cookie. I journal about my hopes and dreams for her in 2012. Hope she can conquer the reading part more!!! LOL.
Hello friends, i have been so busy trying to make sure the house is in order for our traditional Chinese New Year celebrations. Yes... today is the first day and it is huge in our lunar calendar. We make new year goodies.... get the fridge stacked with food to feed visitors and guests. Our house has to be clean. Everyone buy new clothes to wear (this one is not tooooo difficult, LOL)....
TO all my Chinese friends, xin nian kwai Le. Happy Chinese New Year!
Meanwhile, hop over to CSI site and check Case file 3.... soft and beautiful colors. This photo was taken on 2 Jan and gosh... my little baby looks so grown up! She is clever and smart and definitely a witty cookie. I journal about my hopes and dreams for her in 2012. Hope she can conquer the reading part more!!! LOL.


