Friday, March 30, 2012

handmade notebook

I love giving handmade gifts -- it says so much - the person is special to you - i love seeing their faces. Today I want to share a tutorial on making these notepads/notebooks. Absolutely delightful to make. My daughter is already making request for these on her birthdays! Ok, that dpends on how many friends she is inviting over!!!
First I start with some paper, i have chosen this stack of Prima Ledger papers in my stash. I love its heavy weightage and prints. So vintage and lovely. I also set aside a chipboard... a fairly light weight one, that is easily to fold.
I chose 6 sheets(these measure 12x12) and from each sheet I cut 3 pieces of 9x3 inches papers. See this picture below. I have decided to have a 9x3 inch notepad! nice and tall. Next, I stack all the cut up papers together and clip it tightly with a clip. Then i apply glue to the top part. I repeated this maybe 3 times. Just to get the glue to the paper. So it will look like a notepad where you tear from the top.
While waiting for the glue to dry, let's work on the cover.
I cut this to a size of 9.5x3.5 (when folded)
I want it a little larger than the notepad.
Spine will be 0.75inches
Then I painted it with a coat of blue paint.
Painted the inside but only 1 inch from the edge.
Dont forget the spine too.
Then I take a piece of lace (actually it is left over curtain material from the dollar bin in my craft store) Size is about 1/2 an inch larger than the chipboard.
Fold the lace over the chipboard and paste down. Fabric glue works better here.
Then i cut 2 pieces of ribbon (8inch long) and glue down like this.
Paste down the notepad on the right.
Then i take another piece of 9x3 inches paper and paste down on the left.
Added a rub on and a canvas resist butterfly (Prima)
Oh, I tie a pom pom trim over the spine. Just to give it more textures.
Or you can tie a pencil there too.
Finally embellish the cover as you like.
I cover this with lots of Prima flowers and Resin.
Perfect gift!
Hope you like it. Have a great weekend!

Tuesday, March 27, 2012

love love book pages

Hi friends, do you like books? I love them a lot. I love the antiques ones too, with its aged book pages... there is a smell of history... a wisp of time... yep.. anything vintages calls out to me. Glitz designs has this amazing challenge now to use book pages... dictionary pages.. old pages.. but you know what.. they have this product call "book layers" which looks exactly like an old book page. Look no farther.. Glitz has them all.
Here's what I created using one of Glitz book layers... a party bag. Yes.. my daughter has forever on-going birthday party invites and she needs these pretty bags to put her presents for her friends. I altered an all white party bag... volia.. you get this!!! Fun and totally easy to make.
My process:
1) I took a yellow and green spray inks and drip it over the white bag.
Some landed on the book page.. it's ok. I want that random look
2) I cut some banners out of scraps pieces of Glitz papers
3) oh.. that balloon idea came from that book page itself.

Next up, is a layout inspired by the book page itself. Word search. I found a book layer (by Glitz) that has this cute word search... and I am so overjoyed cos it is the perfect element for the story I want to tell. My girl is into word search these days. What a perfect way to tell the story!
Process:
1) I got my girl to do the word search.. give it an authentic feel
2) I cut part of the book layer to get the title "word search".. perfect title. No need for alphas
3) I drip some white paints on th blue background paper.. love the random feel
Finally, a altered box.
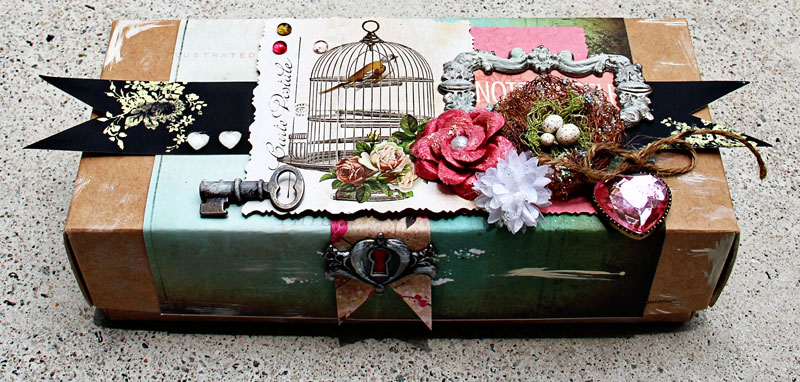
This brown box contains pineapples tarts from Taiwan. A gift from a friend. I found a way to re-purpose this box. Added some Glitz papers and what'snot to it. Dress it up my style. So much fun!
Process:
1) I dry brush some white paint over the box to give it that vintage book
2) Covered the box with Glitz papers and layered with more papers and embellishments
3) I added a Tim Holtz Metal keyhole and key to give it a 'treasure' box look
thanks for dropping by. See you soon!

Wednesday, March 14, 2012

my cute niece

Here's my newest crush!!! my niece! adorable, charming, cute... everything you like in a little girl.
But she is also spunky and assertive! Fun to have in our house.
Here are 2 'lucky' shots I captured of her... intense & focus!
But we had a good laugh about her hair though.
Dont you think it looks like a natural helmet? LOL
That's how the title came about... jokes among my family. :)
see the top fabric flower by Prima. it is originally white.. i 'inject' some blue and pink mist on it. I didn't spray though.. I took the spray noze out and jab at the flower. Fun! Here's a variety of fussy cutting from the G45 papers.. I love cutting! Meanwhile check out my sale page. HERE

Wednesday, February 29, 2012

Glitz Design Feb Challenge

Today I want to share a layout using Glitz Design new paper collection. beautiful vintage colors and patterns. I joined in their Feb Challenge... they have such a gorgeous color challenge that I couldn't resist. So, I played along. Here's my 2 pager --- I want to challenge myself a bit -- to do the unusual.... my first 2pager for 2012. "Happy Day"..... a layout about her birthday.. what we did.. capture the emotions and the laughter. a simple but extremely memorable for us!
More close up:
More close up Here's wishing you a HAPPY day. Dont forget to laugh and have a little fun in your little routines.

Sunday, February 26, 2012

Graphic 45 design team 2012 Auditions

It has been a long love affair with Graphic 45 since it burst into the scrapping scene some years ago. When it was first launched in CHA, their booth won the BEST Booth for that year. It was when my heart floated towards this brand. I love the creativity spirit behind this brand. I can relate to it because it has a sense of playfulness, a spontaneous wit behind every collection. Yes.. the motifs are bold... in fact very bold that some new scrappers are afraid of playing with it. I heard this in the classes I taught. However I always tell my students to see the colors and the idea behind each collection, you will love it. You dont always have to scrap a Halloween layout with a Halloween collection. You can take it to your personal preferences. That's what I love about Graphic 45..... So, today I decide to take a BOLD step to throw my name into the hat. Yes.. I know ... tough to get in among the hundreds... but I want to step out of my comfort zone. It has been a while since I appy for a DT ..... so let's see how this goes... I am nervous.. but found a freedom in my heart to play again.
This is one project I did as a Featured Artist over at G45 blog some years ago. I love this distress and shabby box I made to contain my travel knick knacks! Brushed gesso all over to give it a 'wendy-look'...haha
"Escape" .... using the new collection. I love the blues and orange.... lovely burst of colors. I distress the edges of the papers... rub some inks... drop some paints on it. I tilted the blue paper a bit in case you are feeling a little giddy. LOL. Can you spot the green pleats I made... just the right amout of color.Voila... a very fun layout!
some close up: I cut many many motifs and layered and layered.
I apply some Rock Candy over the butteflies... cool technique!
The fussy cutting possiblities are endless! I made embellishments with it and added mediums to make it POP! "Thank you card"... sweet and sincere. That's what I like my card to be.
Special Memories..... I love Once upon a Springtime Collection. My all time favorite. Lovely fairies, flowers and cute bunnies to cut out. Seriously, I spend lots of happy time cutting for this layout. close up: can you spot the ID chipboard fence. Brush gesso and spray with pearl mists! Just the right amount of fairy dust!! hee..hee..
And some layouts which were published before: 2 page feature of my layout using G45 in Somerset Magazine! A layout published in MM Idea Book. Oh.. this is another of my fave layout! And finally a gift I made for a new mommy! I love to give home made present.
This new mommy can place this in the new baby room! Love love. Simple lovely fussy cutting from the Little Darling collection. The motifs left me drooling! Yes... I covered a cone with a ruffles trim from Maya Road. and then the decoration began. I can't stop adding stuff to this tree.
I love the little clothes... i hang it with wooden pegs...I love the stock... cute bird..I love the pram...Oh.... this got me a bit giddy this morning! (but pardo the bad lighting because of the rain... I am taking clearer pictures once the weather is kinder to me)
If you like this project, let me know. I can share a tutorial soon. I have always share tutorials on projects, techniques and tips on my blog.
Ok, I am keeping my fingers crossed for this DT call.
My style is shabby chic... you will always see my signature touches of paints and mists. And fussy cutting is my 2nd name! haha... And layering too is in my blood.
Hope you like it. Have a great day!

CSI #8

Hello friends, another week has passed and CSI has grown by leaps! We are onto our #8 inspiration prompt. This week colors are my fave.. you have the bright yellows, teals, blues and a bit of olive. You got to join in! HERE Let you in my process: 1) I chose to work the new MME papers because it has most of the colors I need. 2) Then I layered chipboards and ink all the sides to give it a constrast 3) How about some twine moving across the page to give it a whimiscal look By now, I realised I have 2 distinct styles.... 1 is shabby chic... soft, layers... fussy cutting...lots of flowers. The other is this artsy and whimiscal look which I also adore. Usually I love splashing inks and mists and paints over such look. Both styles are natural to me..... and I love it! Which style do you like from me?

Sunday, February 19, 2012

a quick post

Hello friends, here's a quick post of my recent projects but i havn't had the chance to post. Really busy week..... and still breathing hard. LOL.
A card I made using Prima PPP colors... it was featured over at their blog.
And the newest arrivals from Made with Love.. how can I resist! The latest Prima shipment made me giddy!!!! I love Almanac papers and of course every flower and vines...... created this for Made with Love. You can view it at the shop from tomorrow onwards.
And this is for CSI... i forgot to post this last week so here is it! Lots of textures from the burlap, paints and torn edges. I love these colors... fun and vibrant. I played with the new MME 'follow my heart' chipboard (the kite and 'happy day")... this collection is worth checking out. Fun yellow and teal... hmmm... my favorite combo now. You will see more layouts from this collection soon (if I have the chance to scrap tonight or tomrrow... hee..hee..) Thanks for dropping by my friends.