Friday, September 7, 2012

CSI + OUAS

This week is going to be exciting. CSI is teaming up with Once Upon a Sketch.
You will be totally inspired.
Hop HERE and HERE.

Here's my interpretation of the gorgeous sketch. Nadia has the best sketches.


Join in the fun this week.
Leave a comment here (after visiting the 2 sites), I will randomly pick a winner and give away a set of stamps. Here are 2 Prima stamps and 1 set of Prima flowers.
This RAK will end on 14 Sep.


Have fun!

Saturday, August 25, 2012

Case file 34 is open

Hello friends, hop over to CSI and see these gorgeous colors.

The background is actually coral but it appears red than it seems. Oh well....
I played with gesso and olive paints.

i am loving my distressed and torn edges.

Hope you have a great week ahead.

Saturday, August 11, 2012

Textures texures

This week reveal at CSI is such a soothing selection of colors. Hop over now.

I want to share with you some tips in making this page:
1) To create the textured background, I took a piece of kleenx (tissue paper) and some teal paints. Dab over the tissue and it absorbs the paints. You can very interesting creases and textures along the way.

2) I added burlap behind the photos. You can get burlap from Spotlight. I got mine from Australia Spotlight while holidaying there last year. I hope the Singapore store carries this fantastic materials.

3) I found a very 'holey' trim among my Maya Arts trim... another possible way of adding textures.

4) Finally splatter some brown paints over. I also spray a pearl mist over the painted areas.

Hope you like these techniques I share today. Go and try them! Have fun

Monday, August 6, 2012

hello

Hello friends, this is my new CSI case file 30. Using a very soft look... I have used lots of medium to create the background. I am loving it!

Why not take out your mediums and have a blast today?

Monday, July 23, 2012

CSI case 29

Case 29 is open. You have to check out the delicious colors. I hope you can join in this week.
HERE.

I have not scrap my elder for some time. the reason is simple. Tweens hate to have their pictures taken. It takes heavy duty bribes and coaxing to get her to do so. This day is my lucky shot. She is in a good mood. My girl, my girl.. how much she has grown.

Oh... yesterday i pop into my LSS, Made with Love. I carted home a 7G Photo Carousel.
Great promotion now. $174.15 worth, now it is $79.95. I have been wanting to buy this and now the price is toooooooo good to pass.
Check out http://www.madewithlove.com.sg/blog/2012/07/19/trendy-new-arrivals-tuesday-3/

Hope you like this. Happy day to you.

Wednesday, July 11, 2012

Guest Designer

I feel very blessed to be invited by this Russian Scrap site. Check this out HERE.
You will need google translator. hee..hee...
thanks Marina for inviting me.


Lots of paints and gesso. One fave technique now is to distress edges of paper and then I ink/use mists to spray that part to reveal another color. Totally fun! Try it.

Saturday, June 23, 2012

I am back

It has been 2 crazy months...... I realized I hardly touched my scrapping for 2 whole months!!!
Arrggghhh... oh my pain!
But the good news is I have not lost my scrapping brain or heart.
The mojo is still there.  Gasp... I hope!

Here's a page i created for Made with Love.
My brother in law and my cute niece.
Photos like these are sooooo natural and cute.
 I used my favorite techniques of gesso and glimmer mist.
I like to take out the nozzle and just flick it over the page instead of spraying directly onto paper.
This is fast becoming my fave technique.
and i found a new 'fabric'... a gauge mesh ... i love the addition of textures!


And here's a 30min layout done is a flash! that's the time I have.
I love the new Melissa Frances products which have landed in Made with Love.
Go grab them! You have to see it!

The sentiments on this page sums up my 2 months.
I was working very hard but yet I tried to steal time in between work and travel and be with my kids.
Every working mother will understand the guilt, the balancing art and the pain we struggle with.
It is not easy but God's grace is enough for me. 

Have a nice week.

Sunday, May 13, 2012

a new book

Hello friends, i want to share with you this tutorial --- making your own fabric book.
I love the book binding technique and I love the artsy feel to this book.
This book is dedicated to all mothers out there.
Hope you  have a great day yesterday.
This book titled "Dance of Life" ... celebrates the dance, the rythm we have to move to everyday.
We wake up... say a prayer... tend to our children... work (if you are a working mom).... tend to the needs of our husband.... celebrate our life journey.
It is a great journey. Give yourself a pat on the back!
I celebrate with you.

I made this journal for a special person to document her journey.
To celebrate life... to dance to whatever life throws her way and still smile!

I have 6 signatures of papers inside... stitched them together and wrap a doily around it. Dont you love the look of that crotched doily. It is steal at $2. haha... mothers are known to sniff out great deals, dont we!

I created these book pages (6x8inches) with Prima ledger papers... i love these papers... so versatile

And for the cover, I prepared a calico cloth,  a piece of batting and a chipboard. Wrap them up.. i just love the pillow feel of the cover. YOu dont have to sew... just glue everything down with Fabric glue. Fast and easy. Dont we mothers love anything that is fast and easy???  


Okie...I hope you are inspired to create something for yourself! Celebrate the life God has given you!
blessings!

Made with Love assignments

This week i get to play with this really cute chipboard frame. I decided I want to play with a new medium I bought recently. Called Golden Bead Gel... oh... soooo much fun! Join me.
 This gel dries clear but it has bling bling embedded inside. So when it dries, it glistens. Lovely!
I decided on my polka dot mask and this bead gel.... see the outcome!

After the gel dries, I give it a diluted paint wash... and a kitchen towel in another to soak up the extra paint. SO the end result is a little bit uneven but whimisical look. Hmm... I really like it!
Then I add Prima Songbird papers to the background and layered fun elements on it.
This will be a gift to my niece (she is the cutie in the picture... turning 2 soon)
 And 1 more layout for Made With Love --- we have to scrap about places in Singapore.
Yep.. this was the place I used to hang out when I was young. A very popular mall in Singapore in the 1980s... and now it is still my fave! Of course with updates stores and eating places.

Alright, that's a lot to share today. Will come back this week to share a book binding project I did from scratch,..... I love transforming 'nothing' into something! hee..hee...
have a great week

Saturday, May 12, 2012

some sunny love

Recently I am in love with the color "orange'... it seems to be beaming with sunshine and joy. I had to use this color more.
My favorite part has to be the row of flower trims. I brush gesso on it and layered more flowers! I love the dimensions.

Alright, I hope this layout has added some smile and sunshine today!

Monday, April 30, 2012

I am still here

Hello friends, i am back after a long break. I am so happy to share these layouts with you.
I found myself breaking out of my creative box, venturing into these bright and gorgeous colors.
The color orange can be my friend now. Officially I have fallen in love with this color.

Here's from CSI Case 15. really liberating to venture out!

I love the pop of grey/light black I have added.... and the vertical design just lit me up.
and most important of all, I am back with my journal.
Sometimes I feel my creative art has given way ... i lost my way in the decoration and products. I wan to remember it was journaling that draw me to scrapbooking. I am glad i didn't lose this voice of mine.


Here's another one full of sunshine and hope.i love the pairing of orange and turquoise.
This is precisely the emotion I want to capture because during this vacation we stumble upon this amazing oasis. It was stunning! I love such thrill, such surprises. It makes turning a corner real fun.
Actually we were lost .... and then ops, we turn into this paradise. What fun! 


Alright, hope you have a great week ahead. Blessings to you!

Wednesday, April 11, 2012

messy memory

I have 2 girls and dressing them up is part of my mommy privilege. There are some good days and some messy days. Like this special occassion where I doll her up in a new dress and a nice hairdo. But within 15 seconds or maybe 15 minutes.. she looks like this. Messy... as if she steps out of the dumpster truck! Seriously.... well... i have learnt to laugh at moments like these.... or maybe flash out my camera and click!

I use some new Melissa Frances here... I just love their papers and resin. Did i tell you I have a secret obsession with these resin pieces? shhh.... i collect 1 in every design... or maybe 2.... oops! my secret is out. I know.. I found some design in 2s. hmmm....

1) I didn't start with any design in mind. I just layer and layer till i like it. Do you scrap like this sometimes? 2) I added in some seam binding. If you want to buy some, i made some to sell. Look at my sale page ... HERE 3) Oh.. those mica flakes.. my fave medium now!!!! Hope you like this layout. see you soon

Monday, April 2, 2012

Maya Road Goodies

This week, I created a Maya Road 4x4 Canvas for my Made With Love assignment.
We want to feature some Maya Road goodies. I altered this cute little mini with paints and Maya Mists(the orangey yellow is my fave now). I added lots of Maya Road goodies to this album
Inspiration behind this album: I wanted to document all the 'go-to' food places we always go to.My family loves to eat and whenver we are lost as to what cafes or restaurants to go... we will head back to these same places. Our comfort food places or simply convenient places which offer our fave food. I thought it would be nice to journal down these regular hang-outs.
The Cover: I applied gesso with a Crafter's Workshop mask.. see those cute prints.. then I wash it over with teal paint. Then splatter some yellow Maya Mists. Awesome color combo for me!
My kids love eating at Ikea because they get to see the kids furniture (their dream home apparently) ... while my hubby and I love the meat balls and fried chicken wings.
Yep.. our dessert places... ice cream!!! We love visiting new ice cream palour... Daily Scoop is our fave... Udders is mine personally (because it has the best Rum & Raisins)... hahaha
And now some Maya Road goodies for sale. See these 3 boxes of Maya Road products. i am selling part of each because these comes in such a huge assortment
you get 1 of every design in each box... so this is what you will get:
1) 6 doorway chipboard
2) 8 Ornate Tags chipboard
3) 10 Cystal head Pins
selling these for only S$6, including postage to your local address.
Hope you like my project today. Anyone seen the latest Somerset Magazines yet? It left me breathless with all the inspiration!

Friday, March 30, 2012

handmade notebook

I love giving handmade gifts -- it says so much - the person is special to you - i love seeing their faces. Today I want to share a tutorial on making these notepads/notebooks. Absolutely delightful to make. My daughter is already making request for these on her birthdays! Ok, that dpends on how many friends she is inviting over!!!
First I start with some paper, i have chosen this stack of Prima Ledger papers in my stash. I love its heavy weightage and prints. So vintage and lovely. I also set aside a chipboard... a fairly light weight one, that is easily to fold.
I chose 6 sheets(these measure 12x12) and from each sheet I cut 3 pieces of 9x3 inches papers. See this picture below. I have decided to have a 9x3 inch notepad! nice and tall. Next, I stack all the cut up papers together and clip it tightly with a clip. Then i apply glue to the top part. I repeated this maybe 3 times. Just to get the glue to the paper. So it will look like a notepad where you tear from the top.
While waiting for the glue to dry, let's work on the cover.
I cut this to a size of 9.5x3.5 (when folded)
I want it a little larger than the notepad.
Spine will be 0.75inches
Then I painted it with a coat of blue paint.
Painted the inside but only 1 inch from the edge.
Dont forget the spine too.
Then I take a piece of lace (actually it is left over curtain material from the dollar bin in my craft store) Size is about 1/2 an inch larger than the chipboard.
Fold the lace over the chipboard and paste down. Fabric glue works better here.
Then i cut 2 pieces of ribbon (8inch long) and glue down like this.
Paste down the notepad on the right.
Then i take another piece of 9x3 inches paper and paste down on the left.
Added a rub on and a canvas resist butterfly (Prima)
Oh, I tie a pom pom trim over the spine. Just to give it more textures.
Or you can tie a pencil there too.
Finally embellish the cover as you like.
I cover this with lots of Prima flowers and Resin.
Perfect gift!
Hope you like it. Have a great weekend!

Tuesday, March 27, 2012

love love book pages

Hi friends, do you like books? I love them a lot. I love the antiques ones too, with its aged book pages... there is a smell of history... a wisp of time... yep.. anything vintages calls out to me. Glitz designs has this amazing challenge now to use book pages... dictionary pages.. old pages.. but you know what.. they have this product call "book layers" which looks exactly like an old book page. Look no farther.. Glitz has them all.
Here's what I created using one of Glitz book layers... a party bag. Yes.. my daughter has forever on-going birthday party invites and she needs these pretty bags to put her presents for her friends. I altered an all white party bag... volia.. you get this!!! Fun and totally easy to make.
My process:
1) I took a yellow and green spray inks and drip it over the white bag.
Some landed on the book page.. it's ok. I want that random look
2) I cut some banners out of scraps pieces of Glitz papers
3) oh.. that balloon idea came from that book page itself.

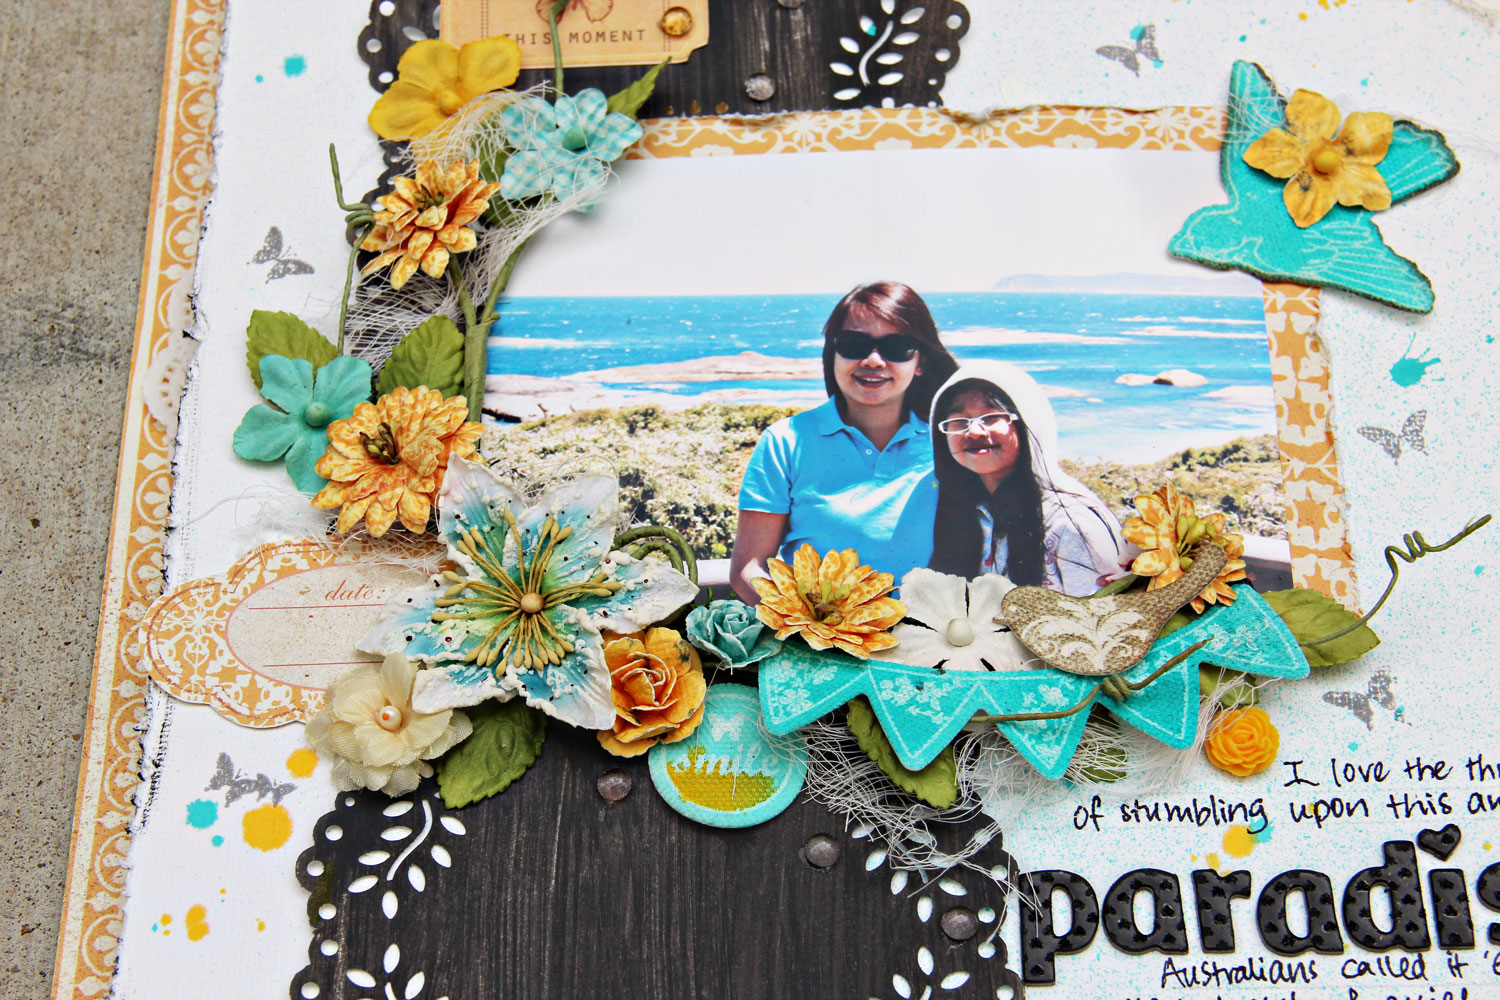
Next up, is a layout inspired by the book page itself. Word search. I found a book layer (by Glitz) that has this cute word search... and I am so overjoyed cos it is the perfect element for the story I want to tell. My girl is into word search these days. What a perfect way to tell the story!
Process:
1) I got my girl to do the word search.. give it an authentic feel
2) I cut part of the book layer to get the title "word search".. perfect title. No need for alphas
3) I drip some white paints on th blue background paper.. love the random feel
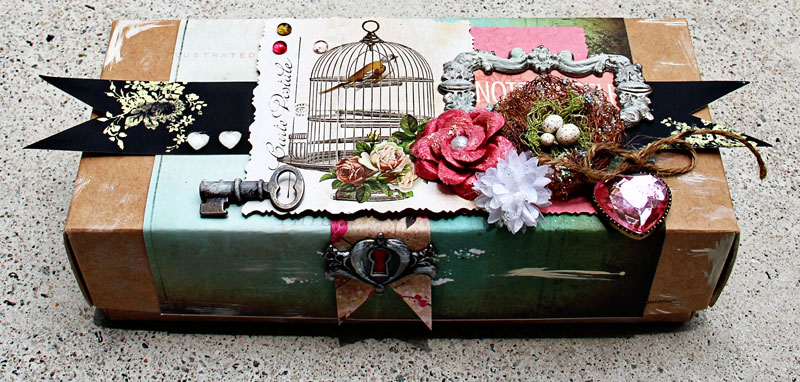
Finally, a altered box.
This brown box contains pineapples tarts from Taiwan. A gift from a friend. I found a way to re-purpose this box. Added some Glitz papers and what'snot to it. Dress it up my style. So much fun!
Process:
1) I dry brush some white paint over the box to give it that vintage book
2) Covered the box with Glitz papers and layered with more papers and embellishments
3) I added a Tim Holtz Metal keyhole and key to give it a 'treasure' box look
thanks for dropping by. See you soon!